The first export from CAD into Blender is fine. You pick STEP or OBJ, you wait, you get your parts, and then you spend an afternoon doing the work that makes them look like something: assigning shaders, marking sharps where the tessellator was too clever, adding a weighted-normal modifier, setting up light linking so the interior emissive does not blow out the shell.
Then engineering moves a boss by two millimetres.
Jimin Kim’s phrasing for what happens next is the one that got my attention —
“the part of that workflow nobody talks about is the second export.” Because
the second export is not a re-import. It is a fresh set of objects with fresh
names, and every hour of look development you did is now attached to objects
that no longer describe the model. Blender has no way to know that
Body1.001 is the same physical part as Body1. Nothing in an OBJ or a STEP
file says so.
Kim’s answer is Fusion to Blender Bridge, a pair of add-ins — one on the Fusion side, one on the Blender side — that reached v1.0.0 on 17 August 2026 under GPL-3.0-or-later. It went past BlenderNation on 4 September.
Identity is the whole problem
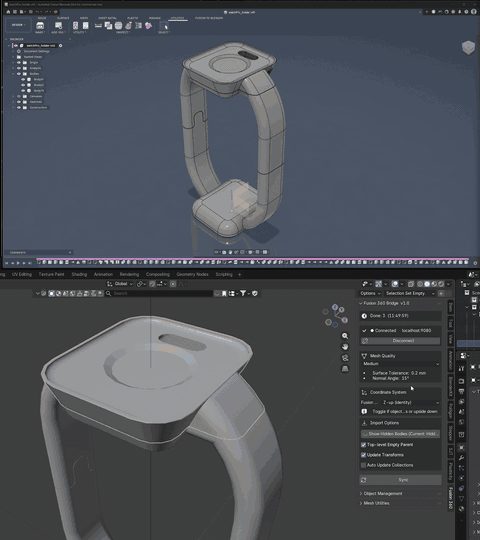
The bridge does not solve tessellation. It solves naming.
Every body in a Fusion design carries a unique ID that Fusion itself uses to track that body across edits. The Fusion-side add-in reads it and ships it with the mesh; the Blender-side add-in stores it on the object and, on the next sync, matches incoming geometry to the object holding the same ID. The mesh data gets replaced. The object — with its material slots, its modifier stack, its custom properties — stays exactly where it was.
That is a small idea and it is the correct one. Every DCC pipeline that has ever survived contact with a revising client is built on some version of it: give the thing a name that outlives its geometry, and reference the name instead of the geometry.
What the README lists as surviving a re-sync is the list of things that actually cost time. Materials and their slot assignments. Modifiers. Hand-marked Sharp, Seam, Crease and Bevel Weight. Light Links.
That last one is easy to skip past. Light linking in Blender is a per-object relationship — you build a collection of objects a lamp is allowed to touch, and a fresh import populates none of it. On a product shot with six or seven lamps doing separate jobs, rebuilding those links after every revision is the kind of tedium that makes people quietly stop revising.
Per-face tessellation, and why it matters more than it sounds
Under the hood the transport is unglamorous and sensible: WebSocket on
127.0.0.1:9080, JSON compressed with zlib at level 1, mesh payloads as
Base64. Localhost only — remote Fusion connections were in early builds and
were removed for v1.0.0 on security grounds, which is the right call for a
thing that accepts geometry and executes in your DCC. It also reads .step
and .stp directly through OCP for models that never came from Fusion.
The detail I would not have expected to see documented is that it tessellates per BRep face and welds vertices with a 1 µm tolerance.
That is a CAD-to-mesh decision with consequences all the way down the pipe. A solid model is made of analytic faces — a plane here, a cylindrical fillet there — and those boundaries are precisely where an artist wants control. Mark this fillet, not that plane. Give the flat face brushed aluminium and leave the chamfer alone. Tessellate the whole solid as one lump and those boundaries become an arbitrary triangulation you have to reconstruct by eye, usually with sharp-edge-by-angle and a lot of swearing.
Tessellating each face separately keeps the boundaries. The 1 µm weld is the other half: without it you get every face as its own island, split normals at every seam, and shading that breaks along edges that are physically continuous. One micron is far below any manufacturing tolerance you would model to and far above float noise, so it welds what should be welded and nothing else.
The thing it deliberately does not do
Fusion Appearances are not imported. The README is blunt about it: the look is yours to author in Blender.
Good. Fusion’s appearance library exists to make a CAD viewport legible during design review, and it is very good at that. It is not a shading model anybody would ship a render from. Importing those materials would give you a scene full of plausible-looking slots that all have to be replaced, which is worse than an empty slot, because an empty slot cannot be mistaken for finished. A tool that knows which half of the job it is not doing is rarer than it should be.
Where it breaks
The ID is only as stable as Fusion makes it, and Fusion changes a body’s ID when you delete the body and create a new one. Modify a body and the ID holds; delete and rebuild and Blender sees a stranger, with your shaders still sitting on the object that used to be it.
Which is a real constraint on how you work upstream, not just downstream. Plenty of people, faced with a part that has gone wrong, delete it and re-model rather than untangle the timeline. Under this bridge that habit costs you the look dev on that part. Nothing the add-on can do about it — Fusion is the authority on what counts as the same body, and it has already decided.
Requirements are Blender 4.2 or newer, 5.0 recommended, and a current Fusion. The author says he is still fixing edge cases as he meets them, which after three weeks is what an honest v1.0.0 sounds like.
Version, licence, transport details, tessellation tolerance, preserved data and the body-ID limitation are from the project’s own README and changelog on GitHub. The developer’s remark about the second export is quoted from BlenderNation’s 4 September post. I have not run the add-on.